
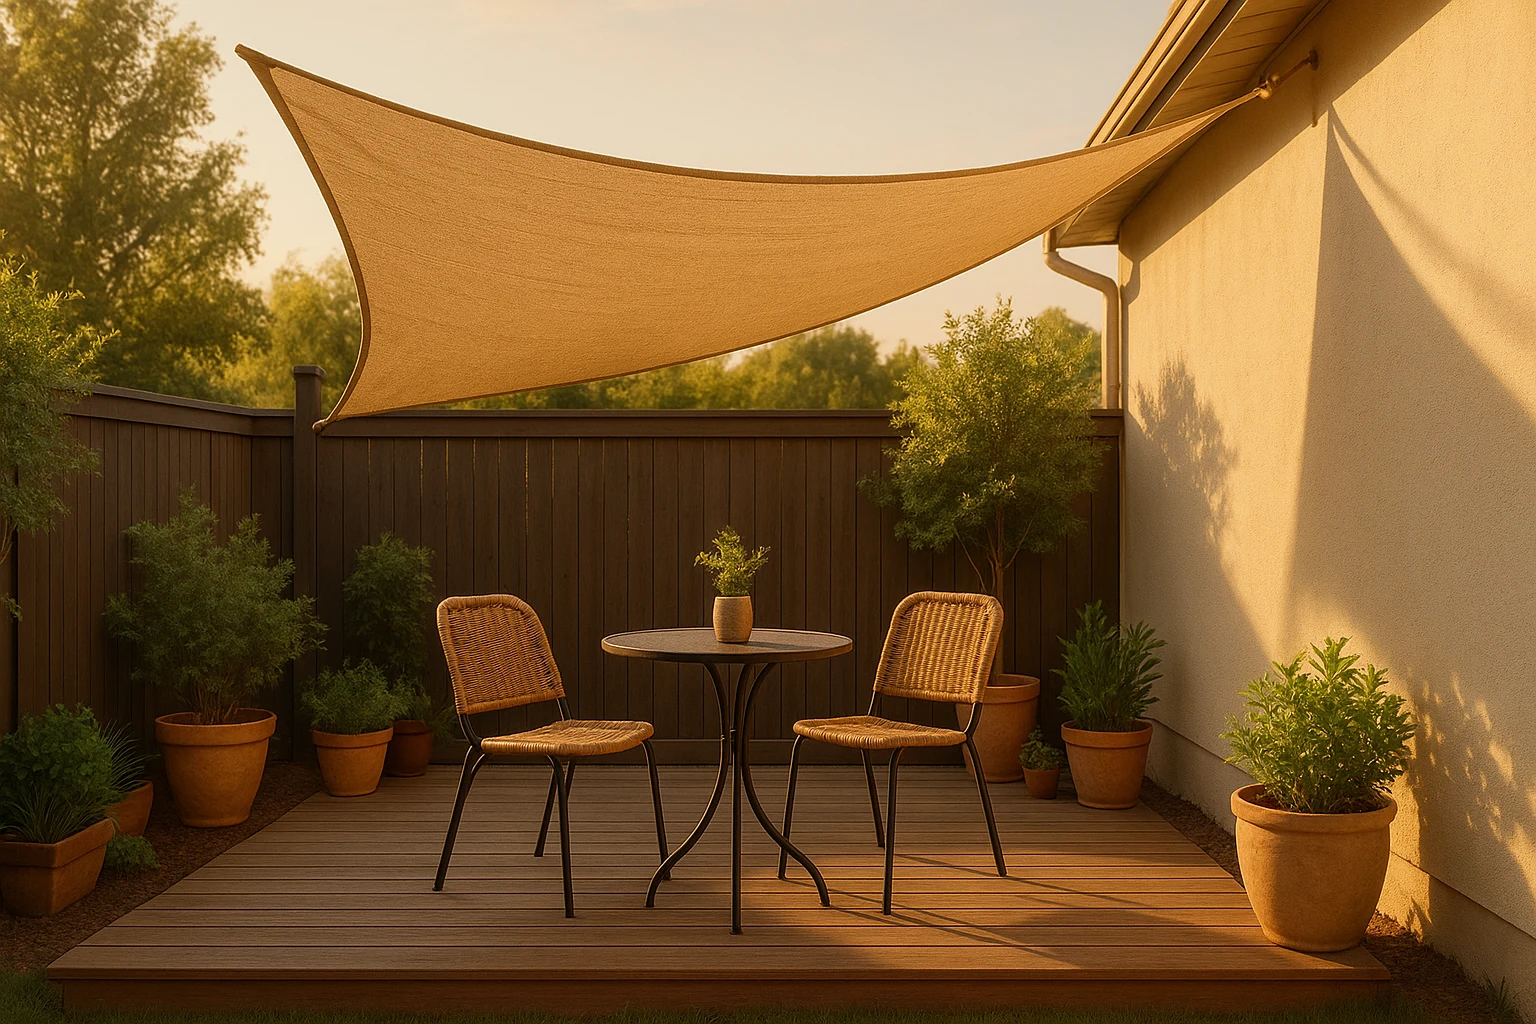
Is your backyard feeling like a sun-scorched desert? Want to enjoy your backyard without sweating buckets or splurging on pricey pergolas? You’re not alone! Many homeowners and renters want comfortable outdoor spaces on a tight budget. We’ve got you covered with three clever budget DIY backyard shade ideas that cost under $20. These affordable solutions will transform your patio, balcony, or yard into a cool, inviting oasis. They’re inspired by the resourceful strategies in our guide to budget DIY home projects — perfect for improving your space without overspending. Let’s dive in!
Explore Budget Backyard Shade Ideas!Table of Contents
- Why Affordable DIY Shade Solutions Save You More Than Money
- Safety Tips Before Starting Your DIY Shade Project
- Idea 1: DIY Drop Cloth Shade Sail for Affordable Backyard Comfort
- Idea 2: Repurposed Curtain Panel Canopy
- Idea 3: Flexible Tarp & Bungee Setup for Cheap Outdoor Shade
- Compare Budget-Friendly Shade Options
- Tips to Maximize Your Budget DIY Backyard Shade Ideas
- Find Your Perfect Shade with Our Interactive Selector
- FAQ: DIY Shade Setup Tips & Troubleshooting
- Conclusion: Create Your Shady Oasis Today
Why Affordable DIY Shade Solutions Save You More Than Money
Who doesn’t love saving money? These budget backyard shade ideas do that and way more! Here’s why they’re a total game-changer for your outdoor space:
- Comfort: No more sweating through hot days — shade turns your backyard into a comfy oasis.
- Protection: Shade may help reduce exposure to harmful UV rays, which may help your skin and outdoor materials last longer (see CDC UV guidance). For tips to keep your outdoor furniture clean, check out these hacks. For community ideas, explore this discussion.
- Usability: A shaded spot becomes your go-to for meals, reading, or sipping a cold drink.
- Flexibility: Most of these solutions are easy to move or take down, perfect for renters or anyone who loves a change.
- Satisfaction: There’s nothing like the pride of building your own shade solution — it’s super rewarding!
Safety Tips Before Starting Your DIY Shade Project
Before you jump into these low-cost backyard shade projects, let’s make sure you’re set up safely with these tips:
- Look out for obstacles: Steer clear of power lines, tree branches, or anything risky where you’re setting up.
- Anchor it tight: Wind can get wild, so secure your shade to solid spots like walls or sturdy posts.
- Pick tough materials: Choose fabrics or tarps that can handle sun, rain, and wind for long-lasting shade.
- Know your sun’s path: Watch how sunlight moves across your yard to place your shade just right.
Sun safety basics: check the UV Index and seek shade during peak hours (often late morning to mid-afternoon), wear protective clothing and sunscreen as appropriate. Always follow manufacturer instructions and local rules for anchors and structures.
Don’t let a tight budget stop you from enjoying your outdoor space. With creativity, you can craft a cool oasis with low-cost backyard shade projects!
This post contains affiliate links. If you buy through our links, we may earn a commission at no extra cost to you. Learn more.
Idea 1: DIY Drop Cloth Shade Sail for Affordable Backyard Comfort
Why It’s a Top Choice for Affordable Outdoor Shade
This gem among affordable shade projects mimics pricey shade sails using budget-friendly painter’s drop cloths, often made of durable canvas or cotton. Here’s why it’s a favorite:
- Affordable: A large canvas drop cloth costs $10–$15.
- Customizable: Cut, sew, or use fabric glue to fit any space.
- Natural Look: Canvas blends seamlessly with outdoor decor, especially if you follow frugal decorating tips.
- Breathable: Allows airflow, unlike solid tarps, for cooler days.
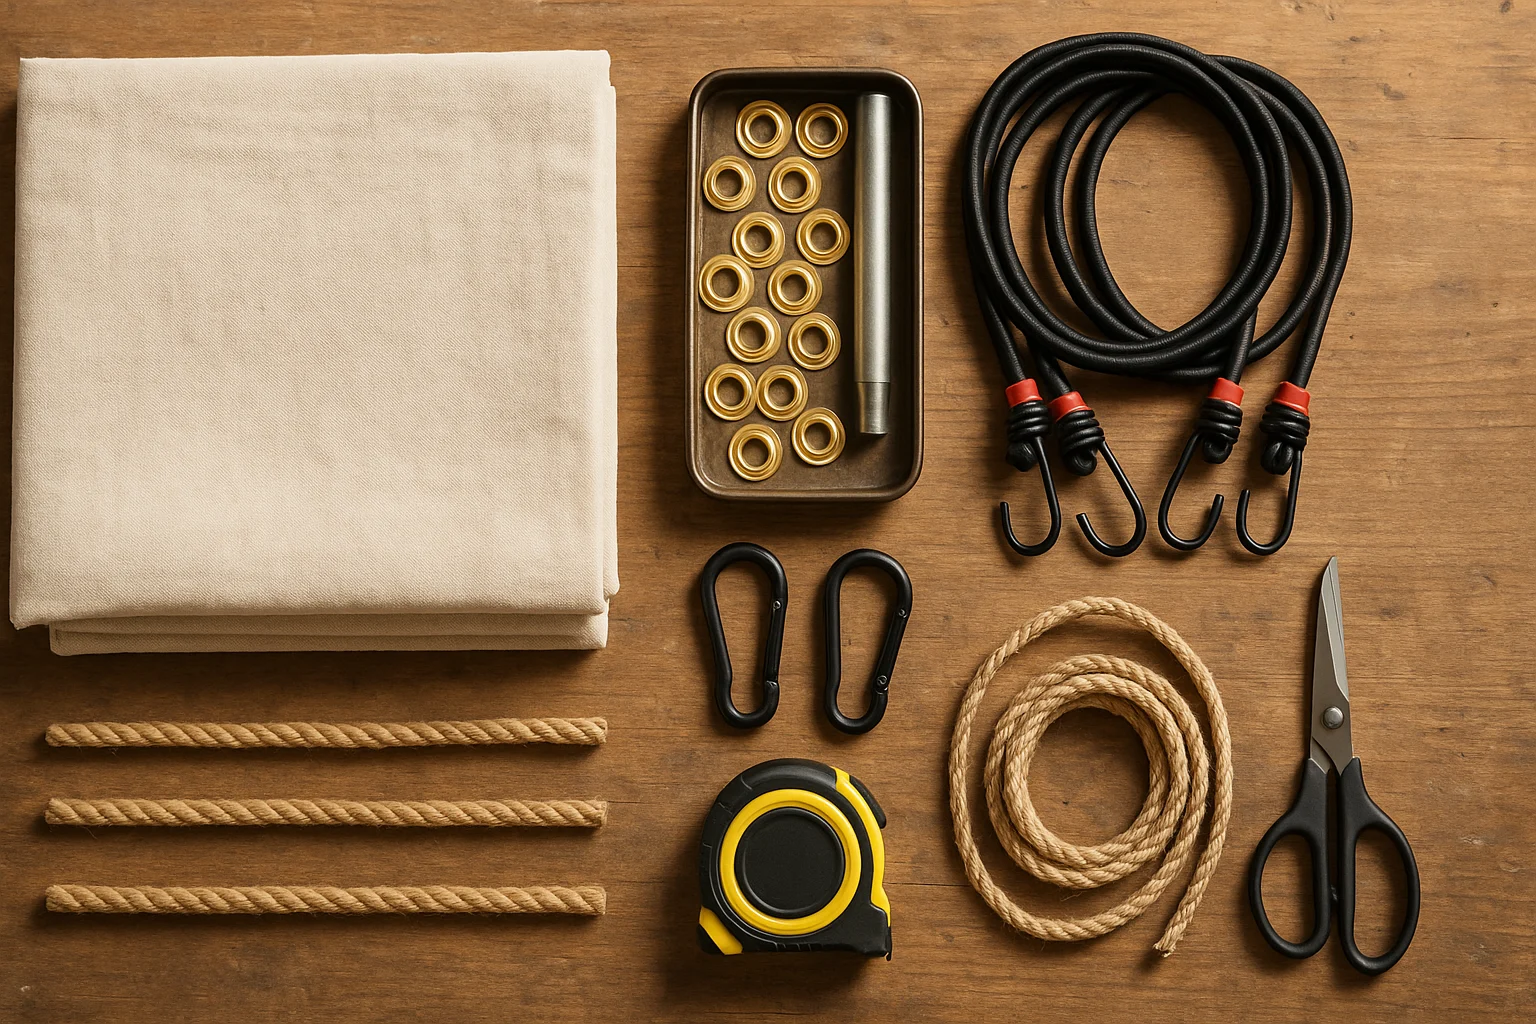
Materials Needed for Your Budget Backyard Shade Project
- Canvas Drop Cloth: 8oz or 10oz, sized for your area ($10–$15, available at Walmart or Amazon).
- Grommet Kit: Includes grommets and tools ($5–$10, craft or hardware stores).
- Rope, Bungee Cords, or Carabiners: For attachment ($0–$5, often already owned).
- Tools: Measuring tape, scissors/utility knife, hammer (for grommets).
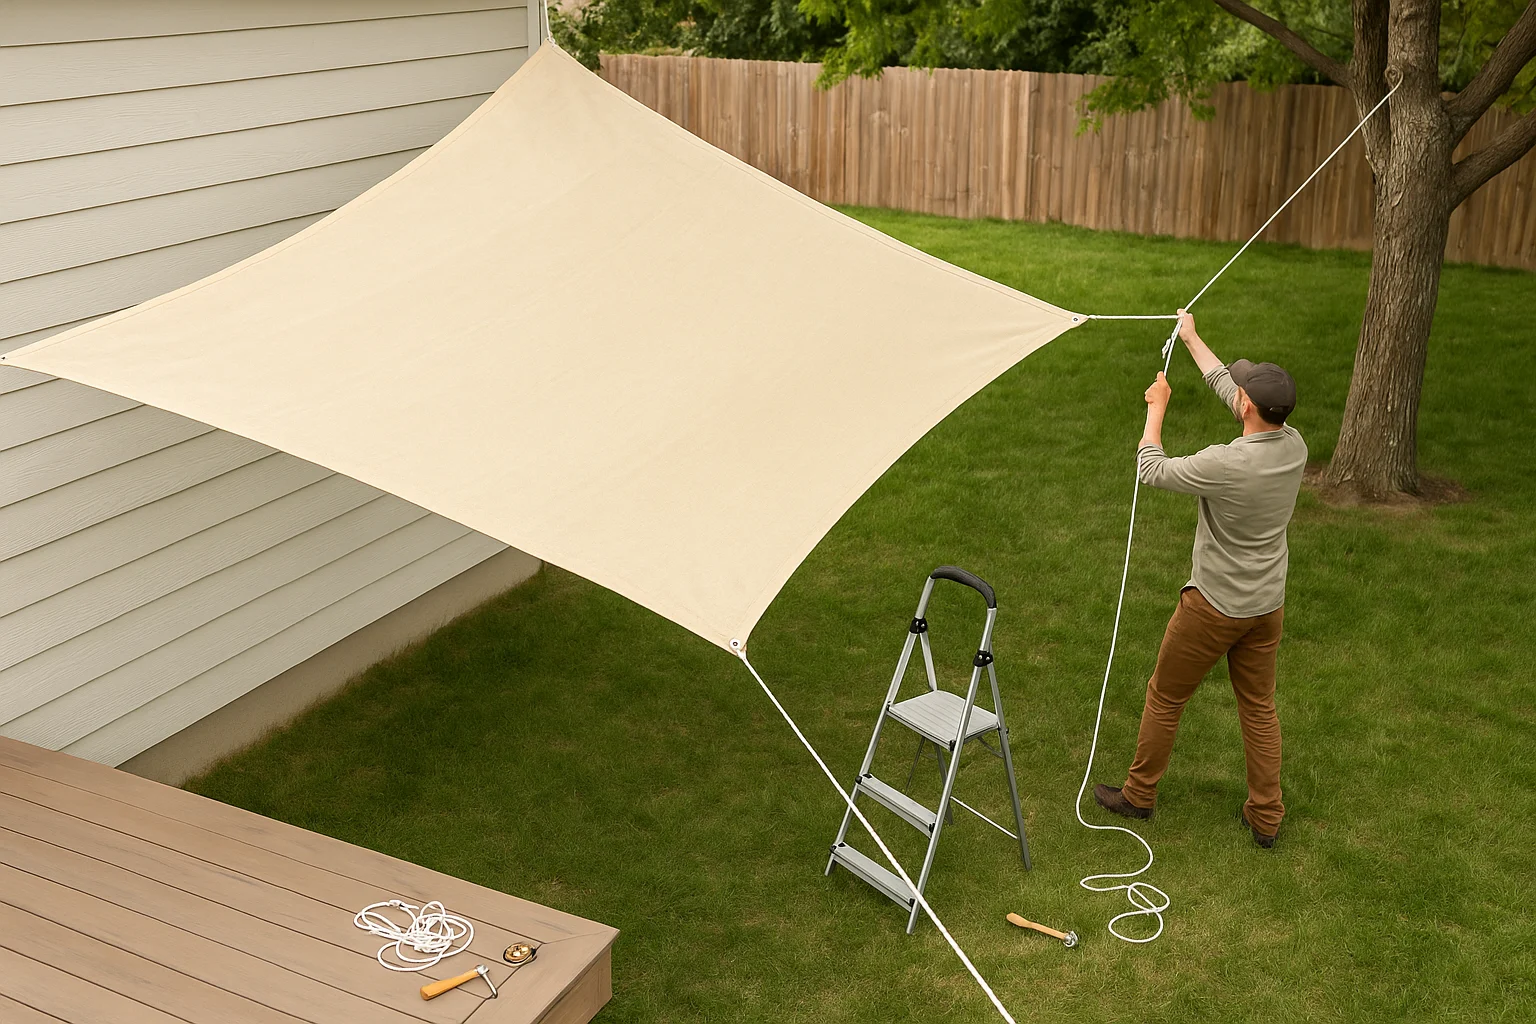
Step-by-Step Instructions
- Measure Your Space: Determine the area to cover, accounting for a taut, angled sail.
- Prepare Drop Cloth: Fold for extra UV protection or cut to size. Hem edges with iron-on tape to prevent fraying.
- Install Grommets: Place grommets at corners and along edges for large sails, following kit instructions. Reinforce corners with extra fabric.
- Identify Anchor Points: Use house walls (eye bolts into studs), strong fence posts, or sturdy trees. For freestanding setups, consider 4×4 posts in concrete.
- Attach Sail: Use rope or bungee cords to connect grommets to anchors. Pull taut and angle one corner lower for water runoff.
Pros & Cons
| Feature | Pros | Cons |
|---|---|---|
| Cost | Extremely low, typically under $20. | N/A |
| Durability | Good for the price; canvas is fairly durable. | Not as weather-resistant as commercial sails; may fade. |
| Sun Coverage | Excellent; can be doubled for UV protection. | Some UV may penetrate untreated canvas. |
| Renter-Friendly | Easy to install/remove without damage. | May need landlord approval for anchors. |
| Wind Resistance | Good if taut and anchored. | Can tear if loose or in high winds. |
| Setup Difficulty | Easy to moderate (grommets take practice). | N/A |
| Best Use Case | Patios, decks, semi-permanent shade. | N/A |
Wind Resistance & Storage
Remove the sail during strong winds to prevent damage. Wash gently, air dry, and store in a cool, dry place to avoid mildew.
For a custom look without the price, a DIY drop cloth shade sail is a sturdy, stylish choice among budget-friendly backyard shade projects.
Idea 2: Repurposed Curtain Panel Canopy
Why It’s Great for Small Spaces
Among affordable DIY shade projects, this option adds elegance with old curtains, perfect for balconies or small patios. Here’s why it works:
- Style Points: Curtains add a chic vibe, perfect for budget-friendly family projects.
- Cheap/Free: Find panels at thrift stores for $5–$15 or repurpose old ones.
- Easy to Install: Many have rod pockets or grommets.
- Light & Airy: Lighter fabrics provide filtered light and airflow.
Materials Needed (Under $20)
- Curtain Panels: Light-colored, sturdy fabrics ($5–$15, thrift stores or Walmart).
- Tension Rods, Rope, or Wire: For hanging ($0–$10).
- S-hooks, Carabiners, or Clip Rings: For attachment ($0–$5).
- Zip Ties or Bungee Cords: To secure bottoms ($0–$5).
Step-by-Step Instructions
- Choose Curtains: Pick thicker fabrics for more shade or sheer for filtered light. Measure your space.
- Determine Hanging Method: Use tension rods for balconies, or stretch rope/wire between anchors.
- Install Anchors: Ensure surfaces are clean for rods or secure eye hooks for ropes.
- Hang Curtains: Slide onto rods or attach with clips. Overlap panels to avoid gaps.
- Secure Bottoms: Use zip ties or weights to prevent flapping in wind.
Pros & Cons
| Feature | Pros | Cons |
|---|---|---|
| Cost | Extremely low, often under $10. | N/A |
| Durability | Varies by fabric; indoor curtains degrade faster. | Not designed for long-term outdoor use. |
| Sun Coverage | Good with opaque fabrics. | Lighter fabrics offer less UV protection. |
| Renter-Friendly | Excellent; minimal fixtures. | May avoid drilling for walls. |
| Wind Resistance | Poor if unsecured. | Requires extra steps for wind. |
| Setup Difficulty | Very easy with rods. | N/A |
| Best Use Case | Balconies, decorative shade | N/A |
Wind Resistance & Storage
Secure bottoms to avoid flapping and remove during strong winds. Wash and store in a dry place or garment bag.
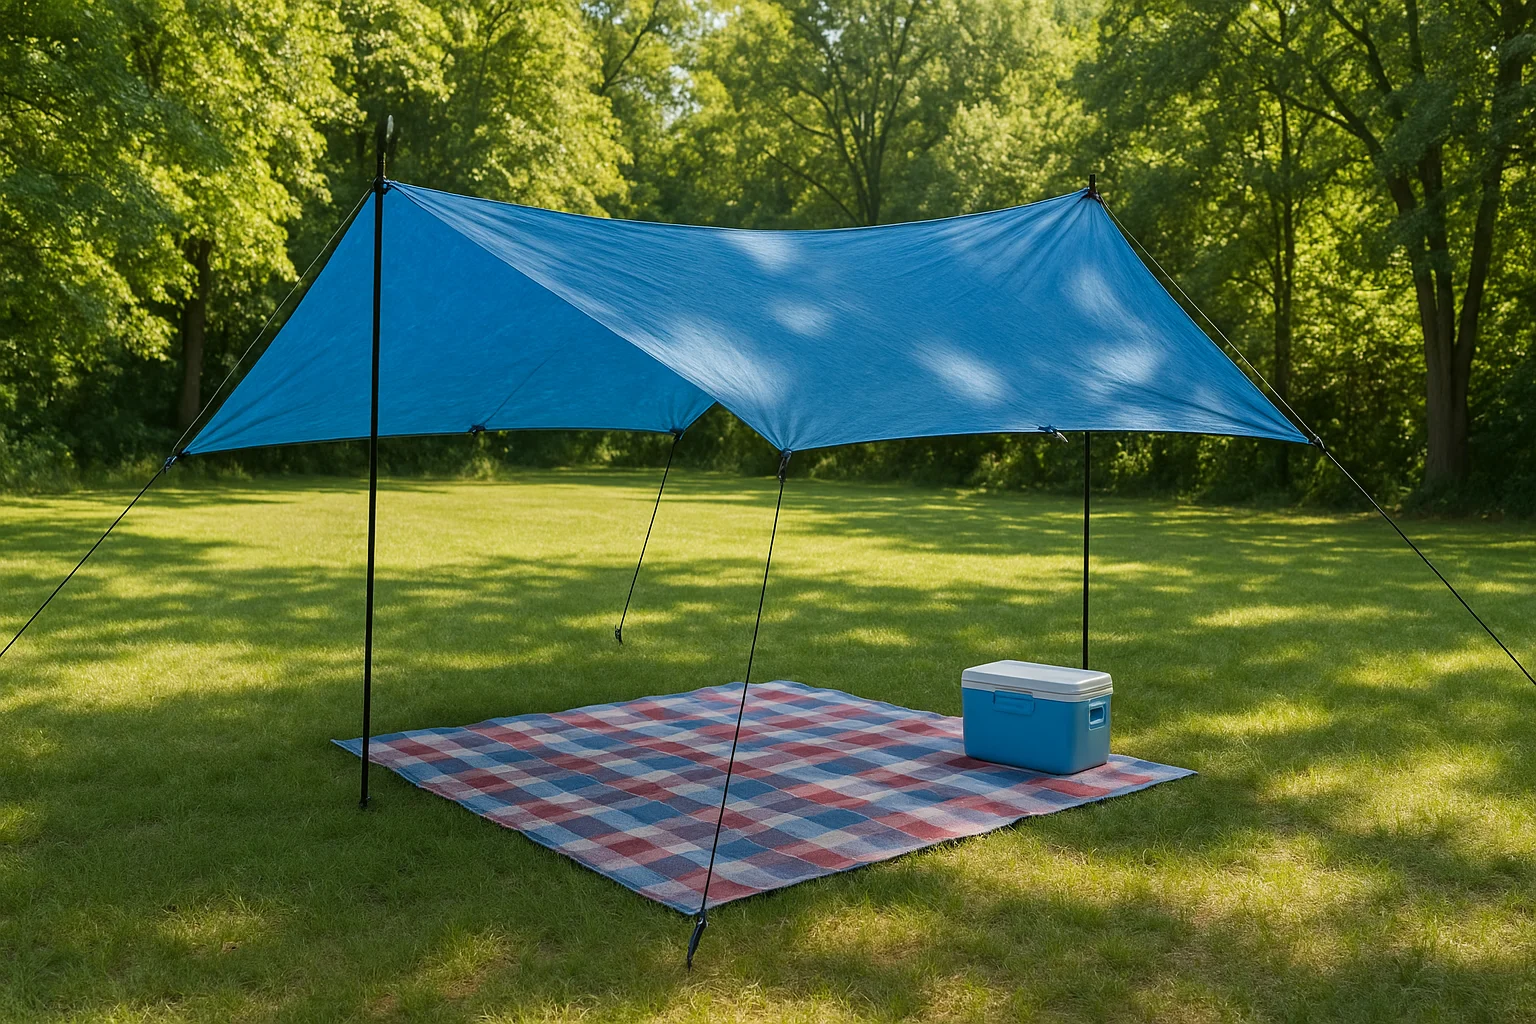
Idea 3: Flexible Tarp & Bungee Setup for Cheap Outdoor Shade
Why It’s Ideal for Budget-Friendly Shade
This versatile budget backyard shade idea offers maximum coverage with tarps, ideal for cheap outdoor shade. This setup is one of the best low-cost outdoor shade solutions for covering large areas quickly. Here’s why it excels:
- Unbeatable Price: Large tarps cost $5–$15.
- Waterproof: Protects from rain and sun.
- Versatile: Pitch as flat canopies, lean-tos, or A-frames.
- Durable: Built for outdoor use, they handle abuse well.
Materials Needed for Budget Backyard Shade Projects
- Tarp: Blue or silver, sized for your needs ($5–$15, Walmart or Amazon).
- Bungee Cords, Rope, or Zip Ties: For tensioning ($5–$10).
- Stakes or Weights: For ground anchoring ($0–$5, or use rocks).
- Poles (Optional): Tent poles or branches ($0–$10).
Step-by-Step Instructions
- Choose Tarp: Select a silver/white tarp to reflect heat.
- Identify Anchors: Use walls, fences, or ground stakes.
- Pick Configuration: Flat, angled, A-frame, or triangular sail.
- Attach & Tension: Use bungee cords or rope, pulling taut to avoid sagging.
- Secure to Ground: Angle stakes at 45 degrees or use heavy weights.
Pros & Cons
| Feature | Pros | Cons |
|---|---|---|
| Cost | Lowest, easily under $20. | N/A |
| Durability | Very good; waterproof and tough. | Grommets may tear if not careful. |
| Sun Coverage | Excellent, especially with reflective tarps. | Can get hot with poor airflow. |
| Renter-Friendly | Highly; easy to set up/remove. | Stakes may be an issue in rentals. |
| Wind Resistance | Good if taut; configurable. | Can be noisy; grommets may tear. |
| Setup Difficulty | Easy to moderate. | Tension can be tricky alone. |
| Best Use Case | Large areas, temporary events | N/A |
Wind Resistance & Storage
Pitch tarps taut to handle wind, but remove during storms. Hose down, dry completely, and store in a cool, dry place.
For ultimate flexibility and robust protection, a tarp setup is a top pick among low-cost backyard shade options.
Comparing Cheap Outdoor Shade Options
Here’s how these budget backyard shade ideas stack up:
| Feature | DIY Drop Cloth Shade Sail | Curtain Panel Canopy | Tarp & Bungee Setup |
|---|---|---|---|
| Cost | $15–$25 (often under $20) | $5–$20 (can be free) | $10–$25 (often under $20) |
| Primary Material | Canvas/cotton drop cloth | Fabric curtains | Polyethylene tarp |
| Durability | Good; decent lifespan | Varies; less durable | Very good; weather-resistant |
| Sun Coverage | Excellent; can be doubled | Good; depends on fabric | Excellent; often reflective |
| Waterproof? | No (unless treated) | No (unless outdoor fabric) | Yes |
| Aesthetic Appeal | Natural, modern | Soft, elegant | Utilitarian |
| Renter-Friendly | Good | Excellent | Excellent |
| Wind Resistance | Good if taut | Poor if unsecured | Good if taut |
| Setup Difficulty | Moderate | Easy | Easy to moderate |
| Best Use Case | Semi-permanent patio shade | Balconies, decorative shade | Temporary, large areas |
Tips to Maximize Your Budget DIY Backyard Shade Ideas
Make the most of these budget-friendly shade solutions with these practical tips:
- Strategic Placement: Position shade to block midday sun for maximum cooling.
- Angle for Success: Angle sails or tarps for water runoff to prevent pooling.
- Strong Anchoring: Use sturdy ropes and eye bolts to resist wind.
- Combine Solutions: Pair a drop cloth sail with curtains for privacy and extra shade.
- Light Colors: Choose white or silver materials to reflect heat.
- Seasonal Storage: Clean and store shade solutions in a dry place during off-seasons.
- UV Protection: Double up fabric or choose UV-resistant materials for better protection.
Find Your Perfect Shade with Our Interactive Selector
This tool helps you pick the best budget DIY backyard shade idea for your needs.
FAQ: DIY Shade Setup Tips & Troubleshooting
Conclusion: Create Your Shady Oasis Today
Ready to chill in your backyard with cheap outdoor shade that doesn’t cost a fortune? These three budget backyard shade ideas — the versatile drop cloth sail, chic curtain canopy, and flexible tarp setup — make it happen for under $20! Whether you’re a homeowner, renter, or DIY lover, these solutions turn your outdoor space into a cool, inviting retreat. For more ways to upgrade your space on a dime, check out our full guide on budget DIY home and garden projects.