
Want a cozy, under-$5 glow in your backyard—no wiring, no hassle? These Dollar Tree DIY solar light projects walk you through five builds under $5 each. Most take 15–40 minutes with easy-to-find parts, from jars to planters. You’ll get clear steps, pro tips, and a quick climate checker so your lights actually last. These ideas are inspired by the resourceful tips shared in our guide to budget DIY home projects. Ready to pick a favorite and start tonight?
Find Your Perfect Solar Project!Table of Contents
- At a Glance: Your Weekend Projects
- Why Dollar Tree Lights Are Great for Budget Solar Projects
- 1. Elegant Mason Jar Solar Lanterns
- 2. Rustic Wire Basket Chandelier
- 3. Glimmering Glass Gem Pathway Lights
- 4. Upside-Down Planter Pedestals
- 5. Faux Frosted Orb Lights – Budget Glow for the Garden
- Check Your Project’s Suitability
- Tips to Make Your Dollar Tree Solar Projects Last
- Why DIY Solar Lighting Shines
- FAQs About Budget-Friendly Solar Crafts
- Ready to Try These Dollar Tree Solar Projects?
At a Glance: Your Weekend Projects
| Project | Cost | Time | Difficulty | Best climate |
|---|---|---|---|---|
| Mason Jar Lanterns | $3.75–$5 | 15–20 min | Easy | Dry/Moderate |
| Wire Basket Chandelier | $5–$7.50 | 25–35 min | Medium | Dry |
| Glass Gem Path Lights | $3.75–$5 | 30–45 min | Medium | Dry/Moderate |
| Planter Pedestals | $3.75–$5 | 20–30 min | Easy | All; seal in wet |
| Frosted Orb Lights | $3.75–$5 | 30–40 min | Easy | Dry/Moderate |
Why Dollar Tree Lights Are Perfect for Budget Solar Light DIY
Before you dive in, here’s why these little $1.25 lights punch above their weight. They’re versatile and take well to simple creative makeovers you can finish after dinner. While not the brightest standalone, their solar panel and LED units are surprisingly durable for simple builds. You can transform these budget finds into stunning decor without fear of costly mistakes. Plus, their self-contained design means no wiring hassles—just pure crafting fun!
Benefits of Using Solar Lights
These lights are eco-friendly, running on renewable solar energy, and they’re easy to reposition as your decor evolves. Moreover, their low cost encourages experimentation, making them ideal for budget-friendly solar lantern projects.
Essential Tools & Materials
While most materials come from Dollar Tree, a few tools will make your projects shine. For instance, a hot glue gun, strong clear adhesive like E6000, zip ties, wire cutters, a drill, and clear outdoor spray sealant are handy. Check out Bob Vila’s guide to the best DIY tools for recommendations on reliable tools to elevate your DIY game. To clean your tools afterward, try this 2-ingredient homemade cleaning solution for upholstery—it works wonders!
Safety: When drilling plastic or using hot glue/E6000, wear eye protection, ventilate your workspace, and let adhesives cure 24–72 hours before outdoor use.
“Who knew a dollar could light up your entire yard? Dollar Tree solar lights are a DIY dream come true for creative solar light makeovers!”

This post contains affiliate links. If you buy through our links, we may earn a commission at no extra cost to you. Learn more.
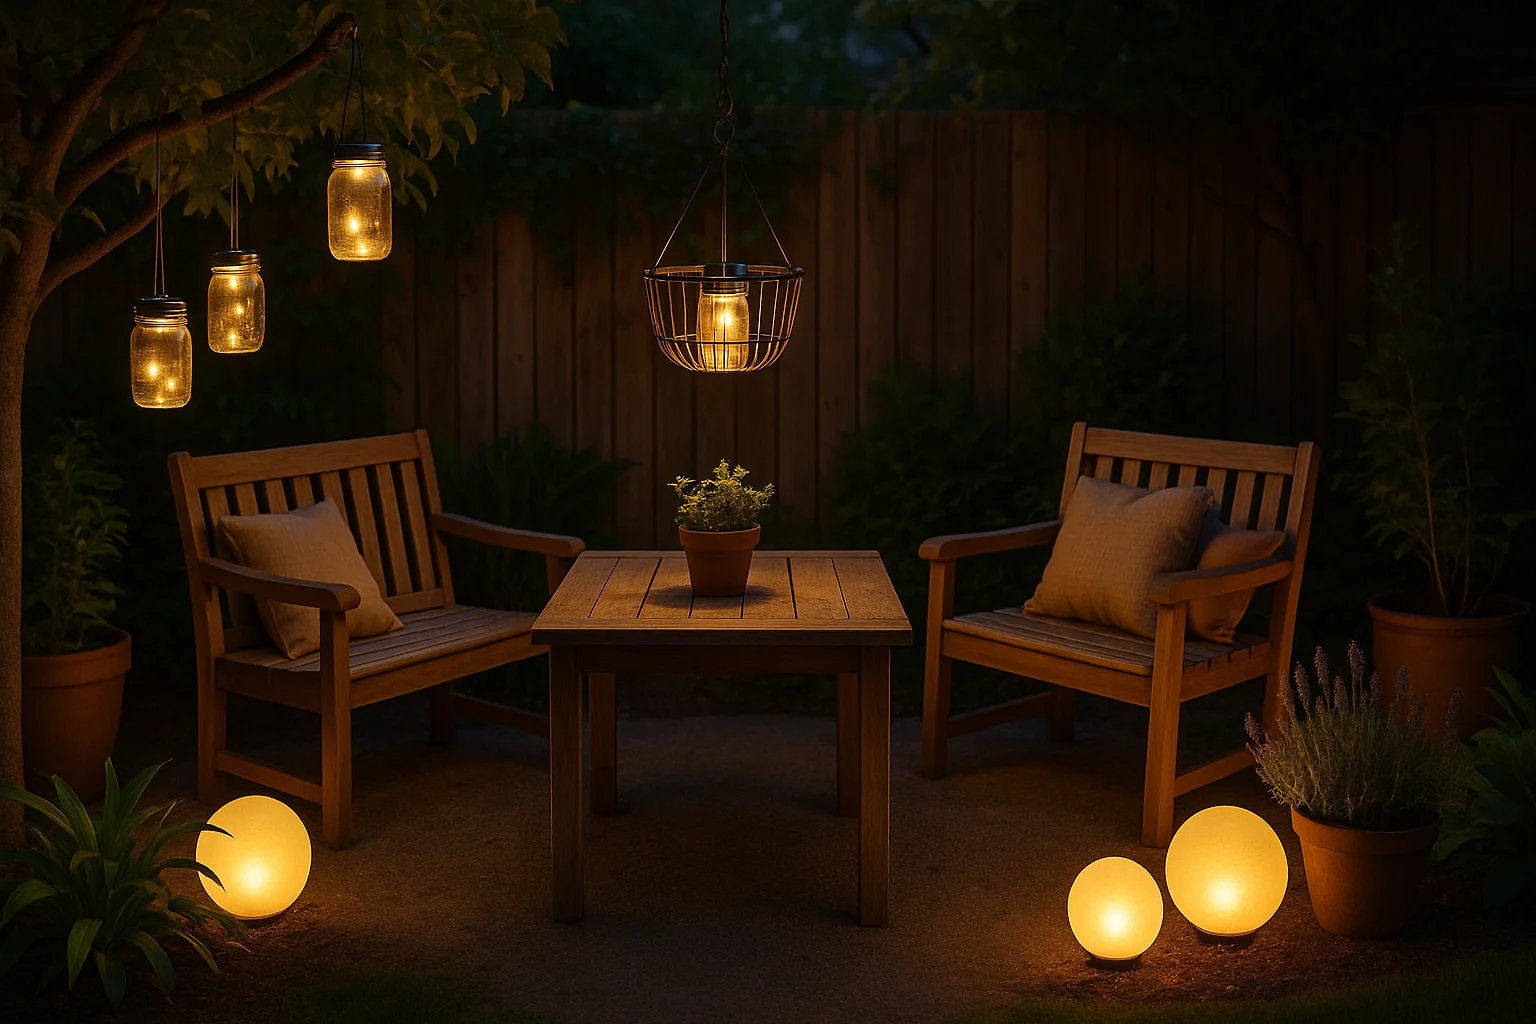
1. Elegant Mason Jar Solar Lanterns
Mason jar lanterns are a timeless favorite in solar decor ideas. They create a soft, inviting glow perfect for patios or pathways. Best of all, they look far more expensive than their $3.75–$5 cost, making them a standout among DIY outdoor lighting from Dollar Tree! You can even gift these lanterns as part of a cheap homemade gift basket for a thoughtful, budget-friendly present.
Materials Needed (Cost: $3.75–$5.00)
- 1–2 Dollar Tree Solar Stake Lights ($1.25–$2.50)
- 1 Large Mason Jar ($1.25)
- Optional: Wire, twine, or jute rope ($1.25)
- Tools: Hot glue gun or strong clear adhesive
Step-by-Step Instructions
- Disassemble: Gently remove the solar panel and light unit from the stake, keeping the LED intact.
- Prep Jar: Ensure the mason jar is clean and dry.
- Attach Solar Unit:
- Inside Top: Glue the solar unit to the inside of the lid with hot glue or adhesive. Let it dry fully.
- Outside Top: For better charging, glue the unit to the lid’s exterior, drilling a small hole for the LED if needed.
- Seal: Screw the lid onto the jar securely.
- Add Handle (Optional): Wrap wire or twine around the jar’s neck for hanging.
- Place: Set in a sunny spot to charge and enjoy the glow!
Styling Tip
These lanterns are ideal for accent lighting at summer gatherings.
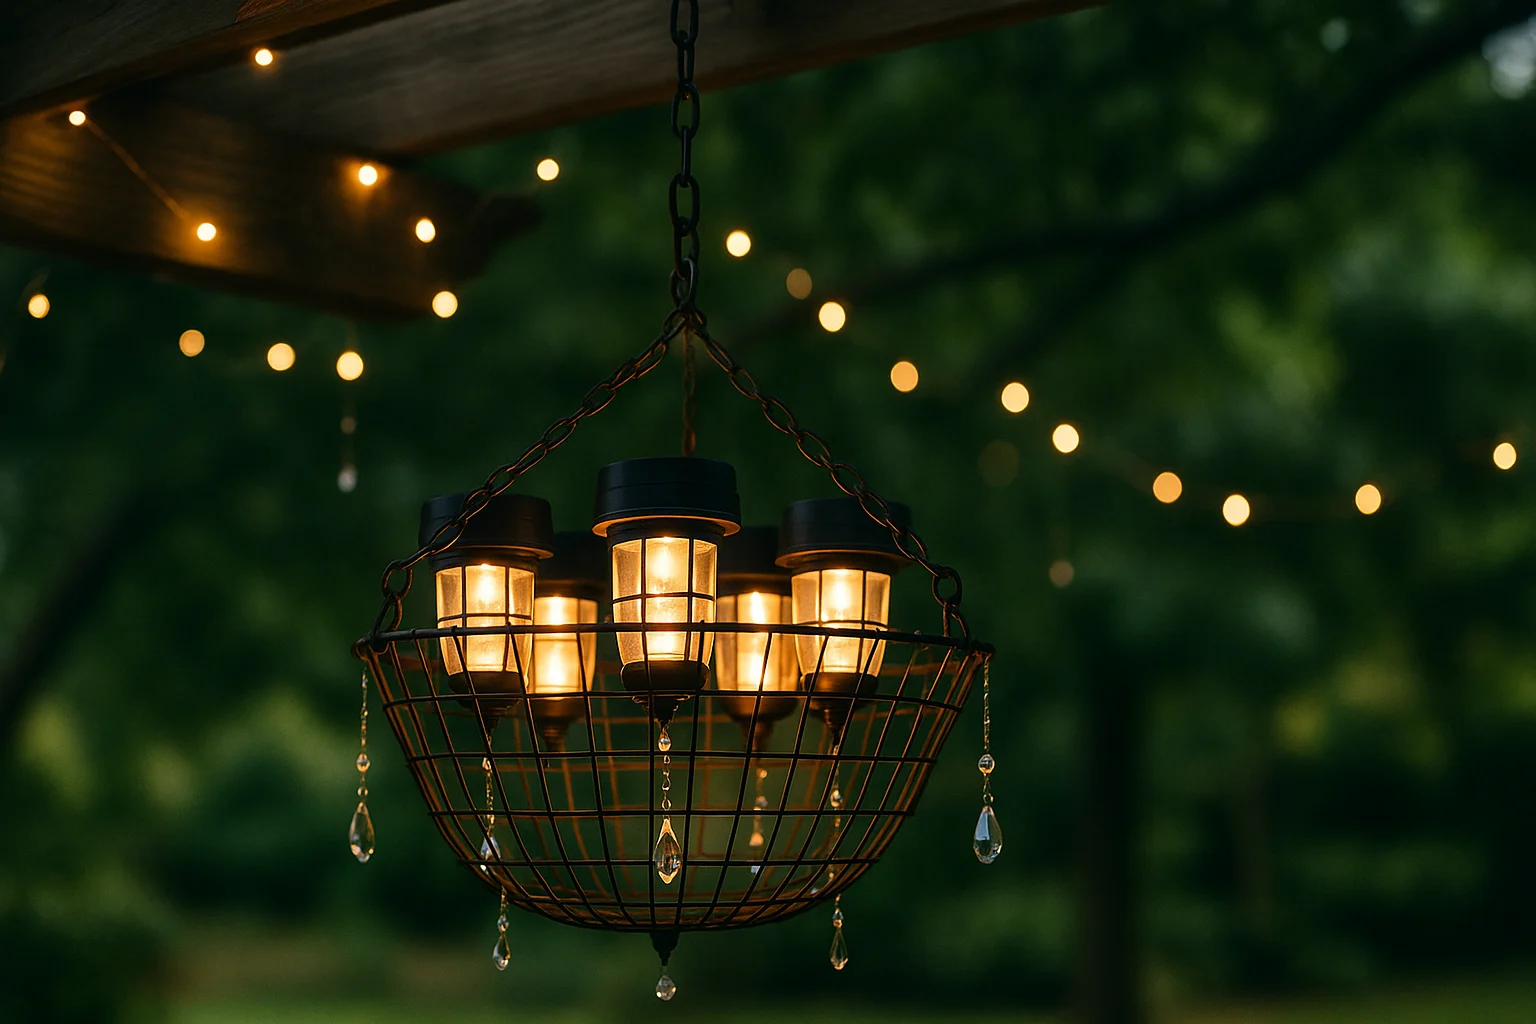
2. Rustic Wire Basket Chandelier
For a bold statement, transform a Dollar Tree wire basket into a charming chandelier. It’s an easy way to add cozy mood lighting over an outdoor table.
Materials Needed (Cost: $3.75–$7.50)
- 1 Dollar Tree Wire Basket ($1.25)
- 3–5 Dollar Tree Solar Stake Lights ($3.75–$6.25)
- Tools: Zip ties, wire cutters, optional clear adhesive
Step-by-Step Instructions
- Disassemble: Remove solar units from stakes.
- Position Lights: Arrange units around the basket’s rim or handle, facing outward or inward.
- Secure: Fasten with zip ties, trimming excess. Add adhesive for extra hold.
- Weatherproof: Apply clear outdoor spray sealant around seams and housings—avoid the solar panel and circuitry.
- Hang: Suspend from a hook or place as a centerpiece.
Styling Tip
Weave Dollar Tree fairy lights or acrylic gems through the basket for extra sparkle, enhancing the mood lighting effect.
3. Glimmering Glass Gem Pathway Lights
These sparkling pathway lights bring a bit of whimsy to any garden. As a standout solar garden light hack, they’re helpful for safety lighting along walkways, making them a must-try among DIY outdoor lighting from Dollar Tree.
Materials Needed (Cost: $3.75–$5.00)
- 1 Dollar Tree Solar Stake Light ($1.25)
- 1–2 Bags of Dollar Tree Glass Gems ($1.25–$2.50)
- Strong Clear Adhesive (e.g., E6000)
Step-by-Step Instructions
- Disassemble: Remove the solar unit from the stake.
- Prep: Clean the plastic light cover.
- Glue Gems: Apply adhesive to the light cover’s base, adding gems to form a decorative collar.
- Layer Up: Continue gluing gems into a dome or cylinder, leaving the solar panel exposed.
- Cure: Let adhesive cure for 24–72 hours for weather resistance.
- Reattach: Return to the stake or glue to a flat base.
- Place: Position along paths for a fairy-tale glow.
Troubleshooting Tip
If lights dim, check for debris on the solar panel or replace the battery with a high-quality rechargeable AA/AAA.
4. Upside-Down Planter Pedestals
Elevate your solar decor with sturdy planter pedestals. These add height and style to your landscaping, helpful for safety lighting. To complement your outdoor setup, you might also like this no-tool DIY pet barrier to keep your pets safe while enjoying your garden.
Materials Needed (Cost: $3.75–$5.00)
- 1 Dollar Tree Plastic Planter ($1.25)
- 1 Dollar Tree Solar Stake Light ($1.25)
- Pebbles, sand, or soil ($1.25)
- Strong clear adhesive or hot glue
- Optional: Spray paint
Step-by-Step Instructions
- Paint (Optional): Spray paint the planter for a premium look; let dry.
- Disassemble: Remove the solar unit from the stake.
- Weight Base: Flip the planter upside down and fill with pebbles or soil for stability.
- Attach: Glue the solar unit to the planter’s top (former bottom).
- Secure: Use zip ties through drainage holes if possible.
- Weatherproof: Seal seams with a clear outdoor spray for durability—keep overspray off the solar panel and any openings.
- Place: Line along driveways or garden beds.
Styling Tip
Create a uniform look by making several pedestals. Add faux succulents around the base for charm.
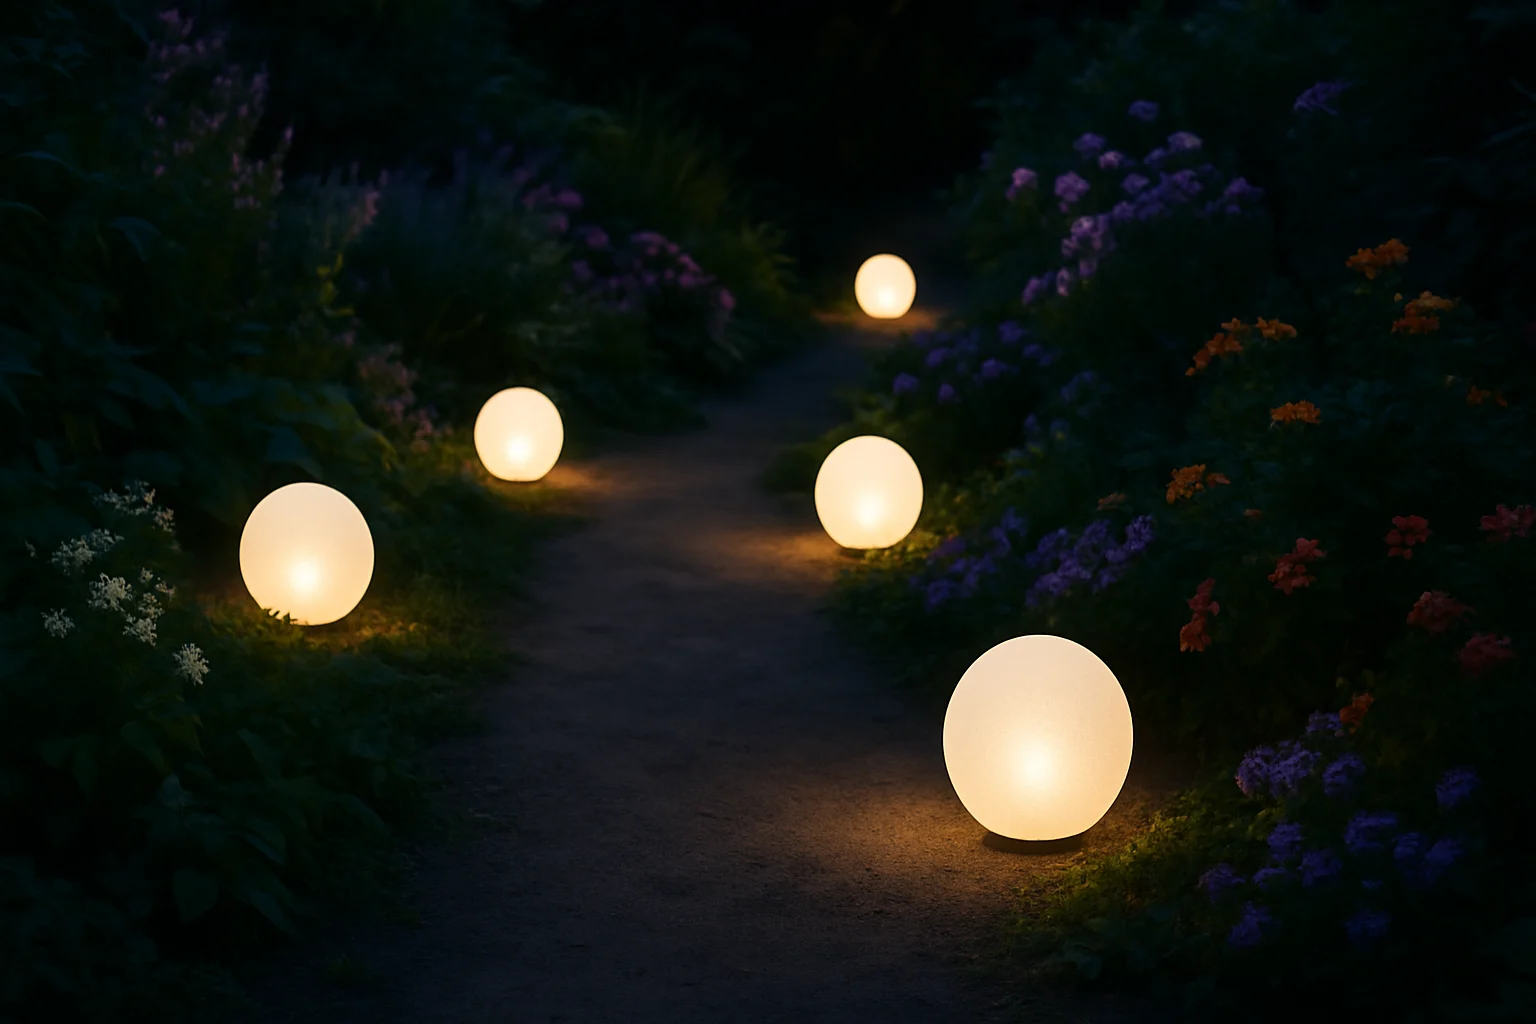
5. Faux Frosted Orb Lights – Budget Glow for the Garden
These elegant orbs create a soft, diffused glow, ideal for mood lighting in gardens. This solar light hack looks surprisingly upscale and shows how far a few Dollar Tree pieces can go.
Materials Needed (Cost: $3.75–$5.00)
- 1 Dollar Tree Clear Plastic Bowl or Globe ($1.25)
- 1 Dollar Tree Solar Stake or Puck Light ($1.25)
- Frosted Glass Spray Paint ($1.25–$2.50)
- Strong Clear Adhesive
- Optional: Small drill bit
Step-by-Step Instructions
- Prep Orb: Clean and dry the plastic bowl.
- Frost: Apply frosted glass spray paint to the bowl’s interior in thin coats; let dry.
- Prepare Light:
- Stake Light: Drill a small hole in the orb’s bottom for the LED.
- Puck Light: Glue directly to the orb’s top.
- Attach: Glue the solar unit to the orb, ensuring the panel gets sunlight.
- Cure: Allow adhesive to cure for 24–72 hours.
- Weatherproof: Seal connection points with clear spray—avoid the panel.
- Place: Nestle in garden beds or along steps.
Troubleshooting Tip
If the light doesn’t charge, ensure the solar panel is clean and unobstructed. In wet climates, a strong adhesive like E6000 holds up better.
Check Your Project’s Suitability
Solar Light Project Suitability Checker
Not sure if your Dollar Tree DIY solar light project fits your climate? Use this tool to get the most from your budget-friendly solar crafts—rain or shine. Just select your project and climate to get custom tips for your budget solar lighting setup.
Select your project and climate to see the suitability! 💡 Try different combinations to optimize your project.
Tips to Make Your Dollar Tree Solar Projects Last
To keep your budget-friendly solar crafts glowing for seasons, try these pro tips:
- Sunlight Placement: Aim for 6–8 hours of direct sun daily where possible; trim branches or move units as seasons change.
- Battery Upgrades: If lights dim, replace with high-quality rechargeable AA/AAA batteries (e.g., NiMH). Avoid standard alkaline batteries, which aren’t designed to recharge.
- Weatherproofing: Use E6000 adhesive and a clear outdoor sealer on seams/joints (keep spray off the panel). Check seals annually in wet climates.
- Maintenance: Clean solar panels monthly with a damp cloth to maximize charging. For a natural cleaning option, try these affordable natural cleaning products at Target.
- Storage: Store indoors during harsh winters to extend lifespan.
- Troubleshooting: If a light fails, check battery connections or test in full sun for 12 hours.
New to solar lights? For the basics, see the U.S. Energy Saver overview of outdoor solar lighting.
Alternative Materials for Budget Solar Light DIY Projects
If your Dollar Tree lacks specific items for solar decor ideas, try thrift stores for mason jars or use plastic containers for orbs. Hardware stores often carry affordable frosted spray paint.
Why DIY Solar Lighting Shines
Beyond savings, these budget solar lighting projects offer unique benefits:
- Personalization: Create lights that match your style.
- Eco-Friendly: Solar power reduces your carbon footprint.
- No Wiring: Enjoy hassle-free setup and flexibility.
- Pride: Relish the joy of crafting something beautiful.
For example, a budget solar lighting project like the frosted orbs can transform your garden into a magical retreat.
FAQs About Budget-Friendly Solar Crafts
Ready to Try These Dollar Tree Solar Projects?
Picture glowing orbs lighting up your next BBQ or mason jars adding charm to your patio—they’re sure to impress! So grab those Dollar Tree lights and start one of these budget-friendly Dollar Tree solar lighting ideas to create a glowing masterpiece—your yard will thank you!
Disclaimer: This article is for informational and entertainment purposes only and is not professional electrical/safety advice. Always follow product safety instructions, use tools/adhesives in a well-ventilated area, and use only appropriate rechargeable batteries for solar lights. Results may vary depending on climate and materials used. Frugal Life Project is not responsible for any damage, injury, or loss related to the execution of the projects described.