
Ever gaze at your backyard and wish it had a bit more sparkle? Perhaps a cozy nook to unwind or a spot to grow fresh herbs? The good news? You don’t need a contractor or a big budget—just a free weekend and a few easy steps. Many stunning transformations can start right in your own backyard with these easy DIY backyard projects, even if you’re short on tools or experience. These ideas are inspired by our guide to budget diy home projects, full of simple, affordable upgrades for both beginners and seasoned DIYers.
Whether you’re a beginner or a seasoned DIYer, these fast backyard DIY ideas will help transform your space—without breaking the bank. Let’s dive into five creative projects you can start this weekend, perfect for anyone tackling a speedy backyard project.
At a Glance: Your Weekend Projects
| Project | Difficulty | Time | Cost |
|---|---|---|---|
| Raised Garden Bed | Beginner | Half to Full Day | $125–$345 |
| Pallet Furniture | Beginner | Half to Full Day | $40–$245 |
| Gravel Patio/Pathway | Beginner–Intermediate | 1–2 Days | $150–$610 |
| Solar Lights | Beginner | Less than Half Day | $20–$135 |
| Vertical Herb Garden | Beginner | Half to Full Day | $60–$160 |
Table of Contents
- At a Glance: Your Weekend Projects
- Getting Started: Tips for a Fun Weekend DIY
- Project 1: Build a Simple Raised Garden Bed 🥕🌿
- Project 2: Craft Pallet Outdoor Furniture 🛋️♻️
- Project 3: Create a Simple Gravel Patio or Pathway 🚶♀️✨
- Project 4: Install Solar Light Pathway or Feature Lighting 💡
- Project 5: Build a Vertical Herb Garden Wall 🌿🪜
- Frequently Asked Questions
- Ready to Transform Your Backyard This Weekend?
Key Takeaways
- 🔑 Transform Your Space Fast: Explore 5 easy backyard DIYs you can wrap up in just one or two days, perfect for a weekend makeover.
- Budget-Friendly & Accessible: Learn how to craft beautiful outdoor features using everyday materials and basic tools, saving money without needing professional help.
- Boost Function & Beauty: From growing fresh veggies in a raised bed to creating a cozy gravel patio, these projects add both practicality and visual appeal to your yard.
- Empower Your Inner DIYer: Get step-by-step instructions, material lists, and helpful tips that make outdoor DIY simple and rewarding, even for complete beginners.
- Enjoy Your Outdoor Oasis: Picture yourself relaxing in your newly enhanced backyard, knowing you created it yourself – a truly satisfying feeling!
Getting Started: Tips for a Quick Backyard DIY
Before you dive into these weekend backyard DIYs, here are a few tips to make your weekend backyard build smooth and enjoyable—perfect for beginners tackling a fast yard upgrade!
- Plan Ahead: Read the guide, list materials, and gather everything before starting.
- Stay Safe: Wear gloves, goggles, and closed-toe shoes.
- Start Small: Pick just one project if you’re new to DIY.
- Team Up: Invite a friend—it’s faster and more fun!
- Check the Weather: Dry weekends are best for outdoor projects.
Check Local Codes & Utilities
Call your local utility-marking service before digging, and review HOA rules/building codes. If a project involves wiring, consult a licensed pro.
This post contains affiliate links. If you buy through our links, we may earn a commission at no extra cost to you. Learn more.
With these tips, you’re ready—let’s get to the best part: the projects!
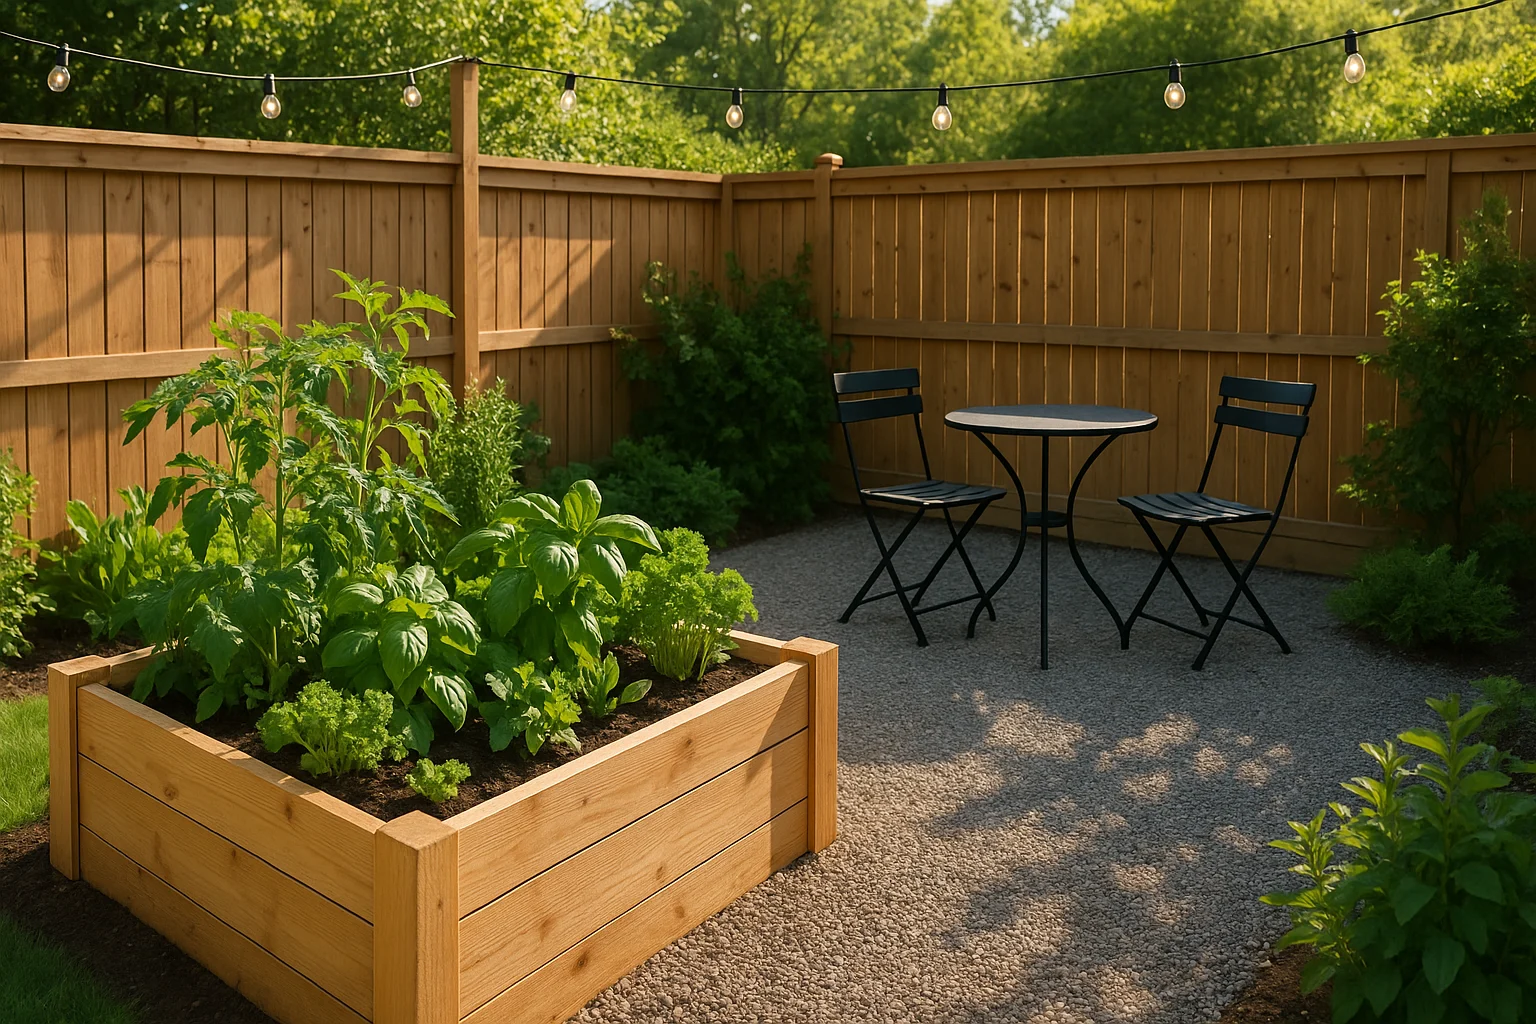
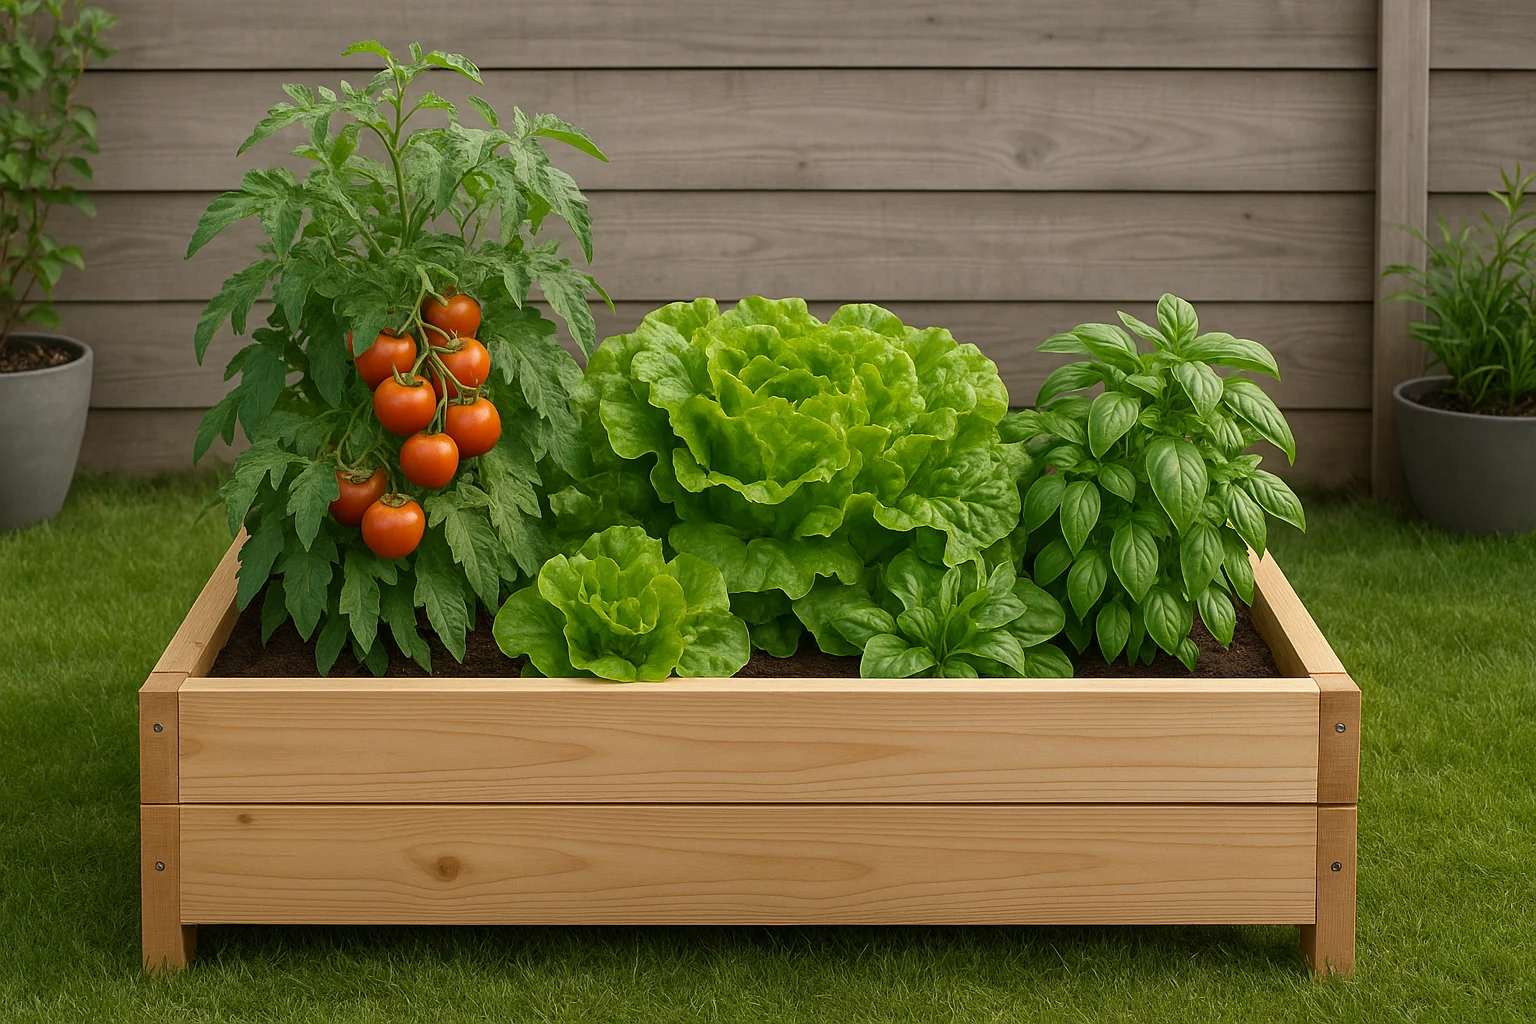
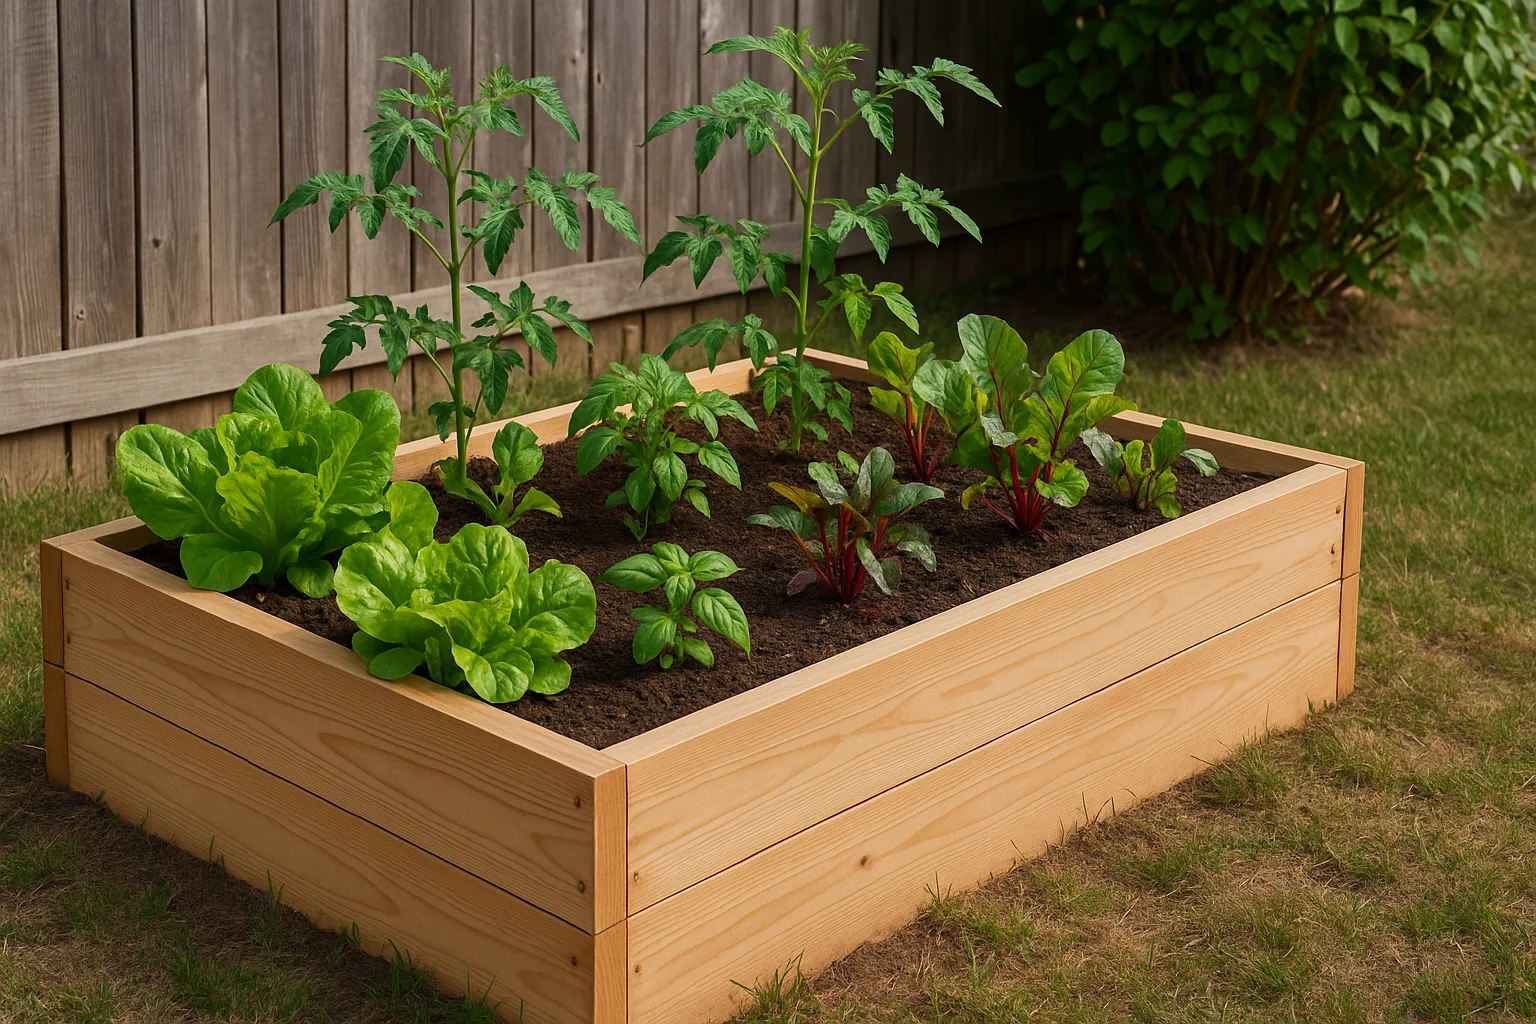
Project 1: Build a Simple Raised Garden Bed 🥕🌿
It’s one of the most rewarding weekend backyard DIYs—perfect for fresh herbs, veggies, and added curb appeal.
Why It’s a Great Choice
- No Digging: You build up, not down, which saves your back.
- Better Soil Control: You fill it with quality soil, so you don’t need to worry about your existing dirt.
- Pest Protection: It’s slightly elevated, which can deter some ground pests.
- Instant Curb Appeal: A tidy, organized growing space elevates your yard’s look.
Before & After Transformation
🏡 Envision a lackluster corner of your yard. After this project, you’ll have a tidy wooden box filled with vibrant herbs or veggies, turning it into a productive garden oasis!
Materials You’ll Need
- Lumber: Four 2×6 or 2×8 boards, 8 feet long (for an 8×4 foot bed) or four 2×6/2×8 boards, 6 feet long (for a 6×3 foot bed). Cedar is a great choice for its rot resistance.
- Corner Brackets or Wood Screws: If using screws, opt for outdoor-rated deck screws, 2.5–3 inches long. You’ll need about 16–24 screws.
- Weed Barrier Fabric (Optional but Recommended): This prevents weeds from growing up into your bed.
- Potting Soil/Garden Soil Mix: For an 8x4x0.5 ft bed, you’ll need about 16 cubic feet of soil.
Using pressure-treated lumber? Choose ground-contact rated boards and consider lining the inside with heavy-duty plastic to reduce soil contact. See guidance from Oregon State University Extension for details.
Tools You’ll Need
- Measuring Tape: For accurate cuts.
- Pencil: For marking cuts.
- Circular Saw or Hand Saw: To cut the boards to size.
- Drill/Driver: If using screws.
- Level: To ensure your bed is even.
- Staple Gun (If using weed barrier): To secure the fabric.
Step-by-Step Guide to Your Raised Garden Bed
- Decide on Your Size: A common size is 8 feet long by 4 feet wide, or 6 feet long by 3 feet wide, as this uses standard lumber lengths efficiently.
- Cut Your Boards: For an 8×4 bed, keep two 8-foot boards as-is and cut two others in half to make four 4-foot pieces.
- Assemble the First Layer: Lay out two longer boards parallel to each other, then place one shorter board at each end to form a rectangle.
- Attach the Corners: Pre-drill pilot holes to prevent splitting, then screw two to three screws at each corner. Alternatively, use L-shaped corner brackets.
- Add More Layers (Optional): For a taller bed, stack another set of boards on top and secure them at the corners.
- Place Your Bed: Move the frame to its spot, ensuring the ground is level using your level.
- Add Weed Barrier (Optional): Lay the fabric inside the bed, stapling it to the wood to block weeds.
- Fill with Soil: Fill your bed with quality garden soil, leaving about an inch from the top.
- Plant Away: Your raised bed is ready for planting. Happy gardening! 🌻
Time Estimate
Total Time: 4–6 hours including prep, building, and filling.
Cost Estimate
- Lumber: $50–$150 (depending on wood type)
- Screws/Brackets: $10–$20
- Weed Barrier: $15–$25
- Soil: $50–$150
- Total: $125–$345 (can be lower with free lumber)
Pro Tip
💡 Consider adding a drip irrigation system to save time on watering. Alternatively, paint or stain your bed with an outdoor-rated sealant for added protection and a pop of color. For more advanced irrigation ideas, check out this guide from The Home Depot.
Measure twice, cut once! Accuracy here ensures a sturdy bed.
For lumber safety considerations, see Oregon State University Extension’s guidance.
Common Mistakes and Fixes
- Uneven Bed: Dig out high spots or add soil to level it.
- Wood Splitting: Pre-drill holes to avoid splits; use filler if needed.
Are You Ready to Build Your Raised Garden Bed?
Answer these quick questions to see if you’re prepared to start this project!
Project 2: Craft Pallet Outdoor Furniture 🛋️♻️
Pallets are perfect for easy DIY backyard projects because they’re often free or cheap and have a rustic charm. You can turn a few pallets into a cool outdoor coffee table or a simple bench, making this one of the most budget-friendly projects on our list. It’s a great way to add style without spending much, and it’s one of my favorite DIY outdoor projects to recommend! This project shows how simple backyard upgrades can elevate your space. It’s a perfect speedy weekend DIY for instant charm. If you love furnishing on a budget, check out this 2025 guide to furnishing your home frugally for more ideas.
Why It’s a Great Choice
- Cost-Effective: Pallets are often free or very low cost.
- Rustic Charm: Gives your outdoor space a unique, reclaimed look.
- Versatile: Can be stacked, cut, and combined in many ways.
- Relatively Quick: Simple designs can be finished in a few hours.
Before & After Transformation
🏡 Think of an empty patio begging for some personality. After completing this project, picture it with a sturdy, rustic coffee table made from reclaimed wood, perfect for holding drinks during a gathering. Or perhaps a charming bench where you can enjoy your morning coffee. As a result, this project adds functional style where there was none!
Materials You’ll Need
- Wooden Pallets: 2–4 pallets (look for “HT” stamp, meaning heat-treated, not chemically treated).
- Outdoor Wood Screws: 2–3 inches long, plenty of them!
- Sandpaper or Electric Sander: Medium to fine grit, to smooth rough spots.
- Outdoor Wood Sealer or Paint: To protect the wood from weather.
- Outdoor Cushions (Optional): For comfort if making a bench.
Tools You’ll Need
- Pry Bar or Pallet Buster (Optional but Helpful): If you need to dismantle pallets.
- Hammer: If using a pry bar.
- Drill/Driver: Essential for screwing.
- Measuring Tape: For accurate placement.
- Pencil: For marking.
- Saw (Hand Saw or Circular Saw): Only if you need to cut pallets to size.
Step-by-Step Guide: Pallet Coffee Table or Bench
- Source & Prep Pallets: Find 2–3 sturdy, clean pallets with the “HT” stamp. Avoid any with spills or odors. Scrub them with soap and water, let them dry, then sand down rough spots, especially on the top surface.
- A little sanding goes a long way for comfort and safety!
- For a Coffee Table: Stack two pallets, align them perfectly, and screw them together at the corners and middle using outdoor screws. Optionally, add caster wheels for mobility or a custom-cut glass top for a smooth surface.
- For a Bench: Use one pallet as the seat (stack two for extra height and secure them). Dismantle another pallet or cut a section for the backrest using a pry bar or saw. Stand the backrest upright at one end of the seat pallet and secure with long outdoor screws, adding wooden blocks or L-brackets for support. Add outdoor cushions for comfort.
- Seal or Paint: Apply a coat of outdoor wood sealer or paint to protect your furniture from the elements. Let it dry fully, possibly applying a second coat.
Time Estimate
Total Time: 4–6 hours including prep, building, and sealing.
Cost Estimate
- Pallets: $0–$30
- Screws: $10–$15
- Sander/Sandpaper: $10–$50
- Sealer/Paint: $20–$50
- Cushions (Optional): $25–$100+
- Total: $40–$245
Pro Tip
💡 For a polished look, fill gaps in the pallet slats with extra wood pieces before sanding and sealing. This creates a solid surface for your furniture.
A little sanding goes a long way for comfort and safety!
Common Mistakes and Fixes
- Loose Pallets: If your table wobbles, add more screws at the corners or use metal braces for stability.
- Rough Surfaces: Forgot to sand? Go back and smooth out any rough spots to avoid splinters.
Project 3: Create a Simple Gravel Patio or Pathway 🚶♀️✨
A gravel patio or pathway is a straightforward easy DIY backyard project that adds texture, function, and style. Moreover, it’s permeable, meaning water drains through, which is great for your yard, making it one of the most practical DIY outdoor projects here. It’s an excellent choice among simple backyard upgrades for enhancing your outdoor space.
Why It’s a Great Choice
- No Heavy Equipment: All hand tools, no concrete mixers.
- Flexible Design: You can design any shape that suits your style.
- Good Drainage: Water won’t pool on your patio.
- Affordable: Gravel is relatively inexpensive.
- Quick to Install: Can be done in a single weekend.
Before & After Transformation
🏡 Picture a muddy corner or worn path in your yard. A gravel patio transforms it into a charming, dry area for a bistro table or a clean, inviting walkway.
Materials You’ll Need
- Gravel: Pea gravel or crushed stone (3/8” to 3/4” size, e.g., 1/2” crushed gravel for better stability). Calculate the amount: (length x width x depth in feet) / 27 = cubic yards. A good depth is 3–4 inches.
- Landscape Fabric/Weed Barrier: To prevent weeds and keep gravel from sinking into the soil.
- Edging Material (Optional but Recommended): Options include plastic garden edging, metal edging, pavers, or treated lumber (2x4s or 2x6s).
- Sand or Crushed Stone Base (Optional): A thin 1–2 inch layer of paver base or sand under the weed barrier for better drainage.
Tools You’ll Need
- Shovel: For digging and spreading.
- Rake: For leveling the gravel.
- Wheelbarrow: To move gravel.
- Measuring Tape: For layout.
- Utility Knife or Scissors: To cut landscape fabric.
- Stakes and String: For outlining your area.
- Hand Tamper or Plate Compactor (Optional): For compacting the base and gravel.
Step-by-Step Guide to Your Gravel Patio
- Outline Your Area: Use stakes and string to mark the shape of your patio or path, ensuring straight lines or smooth curves.
- Excavate the Area: Dig down 4–6 inches within your marked area, sloping it slightly (1/4 inch per foot) away from structures for drainage.
- Install Edging (If Using): Set up your edging material around the perimeter to keep the gravel contained.
- Add Base Layer (Optional): Spread a 1–2 inch layer of sand or crushed stone, then compact it firmly.
- Lay Landscape Fabric: Unroll the fabric over the area, overlapping seams by 6–12 inches, and secure with staples if needed.
- Spread the Gravel: Dump and spread your gravel to a depth of 3–4 inches using a shovel and rake.
- Rake and Level: Rake the gravel for an even depth, then compact it with a tamper for a firm surface.
- Final Touches: Add outdoor furniture, potted plants, or solar lights to complete your space.
Time Estimate
Total Time: 8–12 hours including layout, digging, and gravel spreading.
Cost Estimate
- Gravel: $50–$300
- Landscape Fabric: $20–$60
- Edging Material: $30–$100+
- Tools (if buying): $50–$150
- Total: $150–$610
Pro Tip
💡 For a pathway, consider adding stepping stones on top of the gravel in high-traffic areas for stability and a decorative touch.
A slight slope for drainage is key to a long-lasting, puddle-free patio!
Common Mistakes and Fixes
- Poor Drainage: If water pools, check your slope and add more base material to improve drainage.
- Gravel Spillage: Forgot edging? Add it now to keep the gravel contained.
If drainage issues persist or you want multiple quotes to compare, local gutter pros can assess your specific yard.
Project 4: Install Solar Light Pathway or Feature Lighting 💡
Want to add instant ambiance and safety to your backyard with minimal effort? Solar lights are the answer! In fact, this might be the simplest of our backyard DIY projects, delivering big impact with little work. It’s one of those projects that anyone can do in an afternoon, making it a top pick among DIY outdoor projects! This project shows how simple backyard upgrades can enhance both safety and beauty. I added solar lights to my own path last summer, and now evening strolls have a warm, welcoming glow. For another way to enhance your outdoor ambiance, you might enjoy creating your own candles with the Roxy Epoxy DIY Candle Kit.
Why It’s a Great Choice for a Quick Backyard DIY
- No Wiring: No electrical work needed.
- Energy Efficient: Powered by the sun, so no electricity bill increase.
- Quick to Install: Most lights just push into the ground.
- Creates a soft, inviting glow in the evenings.
- Illuminates pathways and dark spots.
Before & After Transformation
🏡 Visualize a gloomy path or corner that could sparkle with light. After installing solar lights as part of these projects, that pathway glows softly, guiding your steps, and that dark corner becomes an illuminated feature.
Materials and Tools You’ll Need
- Solar Pathway Lights: Choose a weather-resistant style you like.
- Solar Spotlights (Optional): For highlighting features like trees or sculptures.
- Small Shovel or Trowel (Optional): If the ground is hard, to loosen it.
Step-by-Step Guide: Pathway Lights
- Charge Them Up: Place your solar lights in a sunny spot for 8–12 hours to fully charge their batteries.
- Plan Your Layout: Walk your pathway and decide where to place the lights, spacing them 3–6 feet apart for a consistent look.
- Assemble (if needed): Assemble the lights according to package instructions.
- Install Them: Push the stake of each light into the ground along your planned path. Use a trowel for hard ground.
- Adjust and Enjoy: Ensure the solar panel faces the sun. Many lights switch on automatically at dusk.
Step-by-Step Guide: Solar Spotlights
- Charge Them Up: Give them a full charge in direct sunlight.
- Identify Features to Highlight: Choose features like a tree, statue, or water feature.
- Place and Aim: Stake the spotlight into the ground and adjust the head to illuminate your feature.
- Test at Night: Fine-tune the aim after dark for the best effect.
Time Estimate
Total Time: 30 minutes–2 hours for installation, plus 8–12 hours passive charging.
Cost Estimate
- Solar Pathway Lights (Set of 6–12): $20–$60
- Solar Spotlights (Set of 2–4): $25–$75
- Total: $20–$135
Pro Tip
💡 Clean the solar panels every few months with a damp cloth to maintain brightness. If a light stops working, replace the rechargeable battery (usually AA or AAA NiMH).
Place solar lights in spots that get direct sunlight for best performance!
Common Mistakes and Fixes
- Dim Lights: If they’re not bright, ensure they’re in a sunny spot and clean the panels.
- Uneven Placement: Step back and adjust spacing for a uniform look.
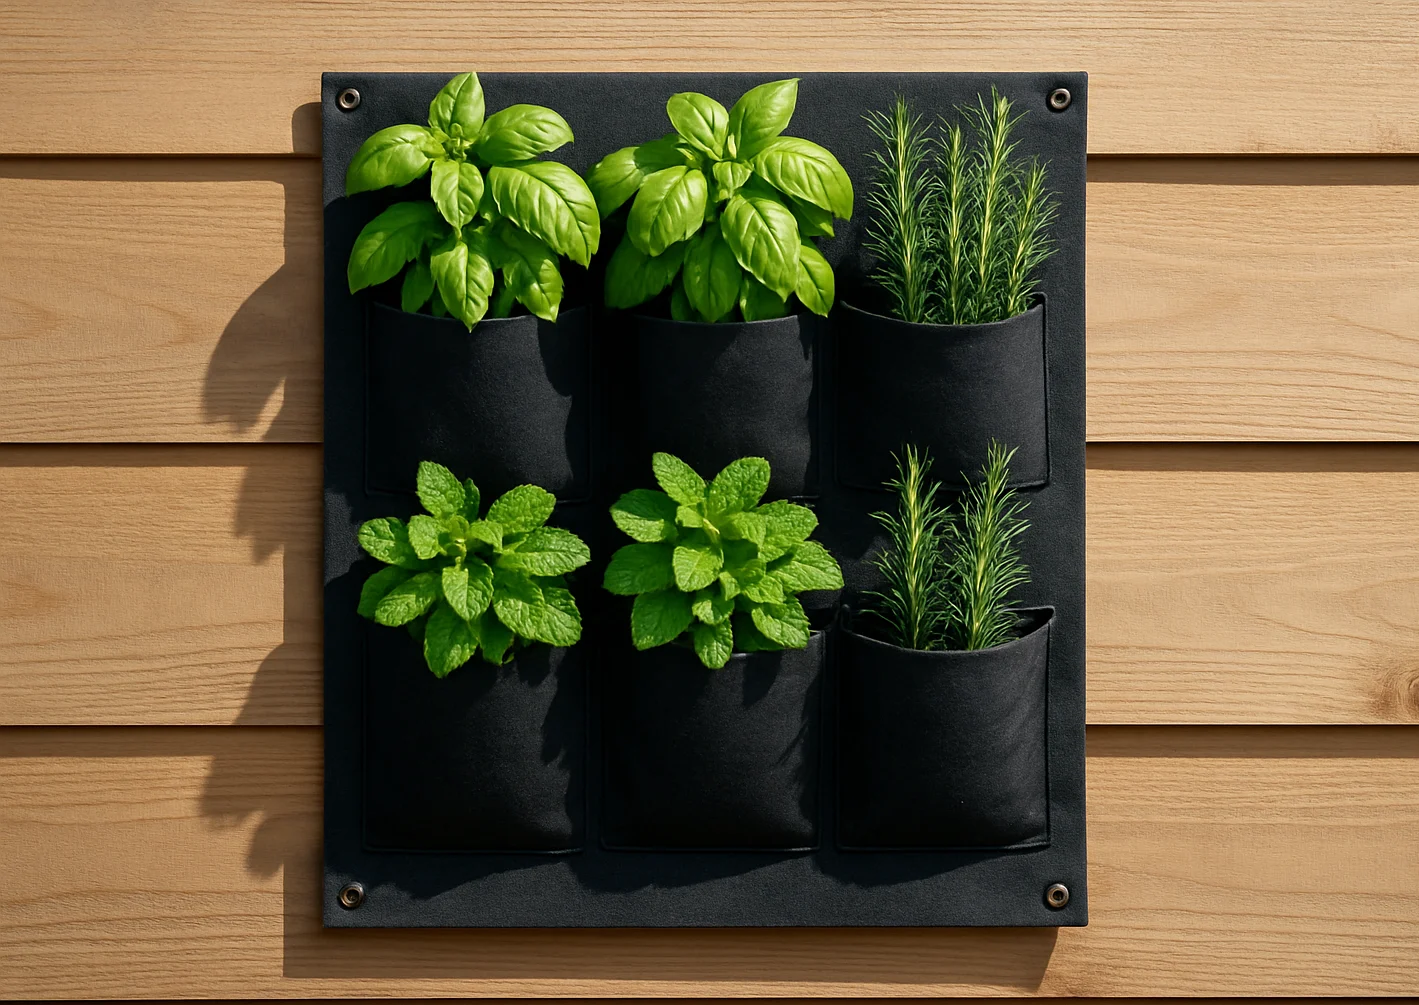
Project 5: Build a Vertical Herb Garden Wall 🌿🪜
Short on space but love fresh herbs? A vertical herb garden wall is a clever and attractive solution! For instance, it’s perfect for small patios or near your back door, making it a charming addition to your weekend backyard DIYs. It’s one of those projects that brings fresh flavors right to your fingertips. I love snipping fresh basil for pasta right from my patio wall! Plus, growing your own herbs can help you save on grocery bills—pair this project with frugal meal planning tips to eat well for less!
Why It’s a Great Choice
- Space-Saving: Ideal for small areas.
- Easy Access: Herbs are at a convenient height for harvesting.
- Aesthetic Appeal: Adds a living, green art piece to your wall.
- Fresh Herbs: Enjoy basil, mint, rosemary, and more, whenever you want!
Before & After Transformation
🏡 Imagine a plain wall or fence in your backyard. After this project, that boring wall transforms into a vibrant, fragrant display of lush green herbs growing in stylish pockets. Ultimately, it adds gourmet convenience and beautiful decor to your space!
Materials You’ll Need
Option A: Hanging Planter Pockets/Bags
- Vertical Garden Planter Pockets/Bags: Fabric or plastic modules designed to hang.
- Sturdy Hooks or Screws: To hang the planter pockets.
- Potting Soil: Lightweight potting mix.
- Herb Plants or Seeds: Basil, mint, thyme, etc.
Option B: Repurposed Pallet with Small Pots
- Wooden Pallet: One clean, heat-treated pallet.
- Small Terracotta or Plastic Pots: To fit in the pallet slats.
- Potting Soil: Lightweight mix.
- Herb Plants or Seeds: Your favorites.
- Screws and Drill: For attaching pots or reinforcing the pallet.
- Strong Staples and Staple Gun: If creating fabric pockets.
- Outdoor Wood Sealer (Optional): To protect the pallet.
Tools You’ll Need
- Drill/Driver: For screws or hooks.
- Level: To ensure your pallet or hanging system is straight.
- Measuring Tape: For spacing.
- Pencil: For marking.
- Staple Gun (if using Option B): For fabric pockets.
- Gloves: For handling soil and plants.
Step-by-Step Guide: Hanging Planter Pockets
- Choose Your Spot: Select a wall that gets 4–6 hours of direct sunlight daily, ideal for sun-loving herbs like basil.
- Install Hanging Hardware: Mark your spot, use a level for straightness, and install sturdy hooks or screws.
- Fill Planter Pockets: Fill each pocket with potting soil, leaving an inch from the top.
- Plant Your Herbs: Plant seedlings or sow seeds, then water thoroughly.
- Hang Your Garden: Lift and hang your planter onto the hooks, ensuring it’s secure.
- Water & Maintain: Water regularly and harvest often to encourage growth.
Step-by-Step Guide: Repurposed Pallet Herb Wall
- Prepare the Pallet: Find a clean pallet, optionally paint or seal it, and let it dry.
- Option B1: Hanging Pots on Pallet: Attach hooks to the slats and hang small pots with S-hooks.
- Option B2: Fabric Pockets within Pallet: Turn the pallet on its side, staple heavy-duty fabric inside the slats to create pockets.
- Mount the Pallet: Lean it against a wall or secure it with L-brackets, ensuring it’s level.
- Fill and Plant: Fill pots or pockets with soil and plant your herbs.
- Water & Maintain: Water regularly and enjoy your fresh herbs!
Time Estimate
Total Time: 4–6 hours including prep, building, and planting.
Cost Estimate
- Vertical Planter Pockets: $20–$50
- Pallet (if buying): $0–$15
- Potting Soil: $15–$30
- Herb Plants/Seeds: $20–$50
- Hooks/Screws/Staples: $5–$15
- Total: $60–$160
Pro Tip
💡 Choose herbs with similar needs for each section. For example, group sun-loving rosemary and thyme together, and moisture-loving mint and parsley in another.
Sunlight is key for happy herbs! Choose your wall wisely.
Common Mistakes and Fixes
- Overwatering: Vertical gardens dry out fast, but don’t overdo it—check soil moisture daily.
- Poor Sunlight: If herbs aren’t thriving, move the garden to a sunnier spot.
Frequently Asked Questions
Ready to Try Easy DIY Backyard Projects This Weekend?
There you have it! Five fantastic, easy DIY backyard projects that are perfect for a weekend makeover. Whether you dream of fresh veggies, a cozy seating area, a charming pathway, or a fragrant herb wall, these ideas prove that big changes don’t require big budgets or endless time.
So, choose the weekend backyard DIY project that excites you most, grab your materials, and get ready to feel the joy of transforming your backyard with your own hands—I promise it’s worth it! Happy DIYing! ✨🏡